Development Tutorial
1. Game Loop Concept
Section titled “1. Game Loop Concept”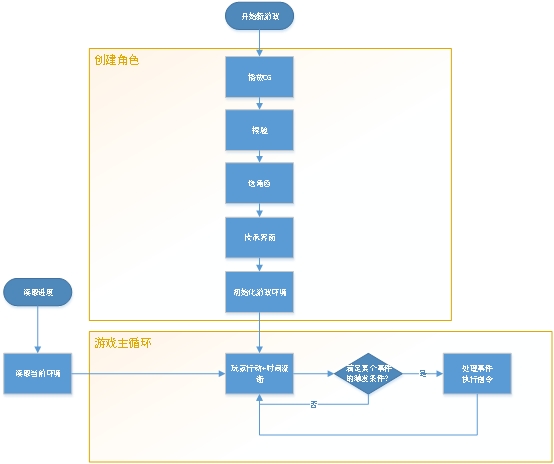
Game main loop logic diagram
As shown above, the core game loop is triggers plus events.
A trigger is a set of specific conditions. An event is a set of commands that need to be executed.
During gameplay, the player keeps taking actions, and time flows with those actions. Various events are triggered on top of that flow, then a series of game commands runs. Together, this forms the game’s main loop.
Inside an event, commands execute strictly in order. The next command runs only after the previous command finishes. At the end of an event, conditional jump relationships can route execution to different events under different conditions.
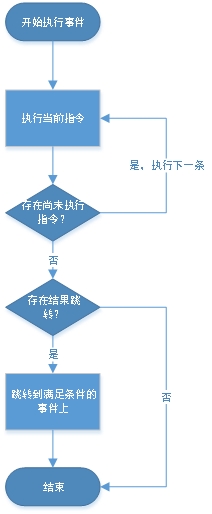
Event processing flow
2. Project Configuration
Section titled “2. Project Configuration”Project standard config file: Config/default.json
The file uses JSON format. Its keys are:
When the valid scope is Story, the field is only available for MODs with type=Story (story campaign mode).
| Parameter | Can Be Empty | Valid Scope | Description |
|---|---|---|---|
| type | No | Plugin/Story | MOD type. Plugin means plugin, Story means story campaign. |
| name | No | Plugin/Story | Display name of the MOD. |
| desc | Yes | Plugin/Story | MOD description. |
| tags | Yes | Plugin/Story | Tags that affect Steam Workshop search categories. Separate multiple tags with the half-width ;. Use English tag names:Scenarios story Maps maps Items items Characters characters Skills skills Appearance appearance, such as models and character skins BattleUnits units and battle units Rules rules Audios audio Cheating cheating |
| start_scene | Yes | Story | Starting scene. Defaults to character creation if empty. Options: 0: Sands of Salzaar CG scene 1: character creation, also the default when empty 2: sandbox scene, requiring a default main character role Only valid in Story mode. |
| include_main_game | Yes | Story | Whether to reference main Sands of Salzaar project resources. Only used in Story mode. 0: reference no data 1: reference full Sands of Salzaar data, default 2: reference base data only, recommended for independent stories |
| homepage_background | Yes | Story | Main menu background replacement. Fill in the full image resource path. Only valid in Story mode. |
| audioControllerAdditional | Yes | Plugin/Story | Only available in professional projects. Full path to audio middleware. See specific examples; can be empty. |
Config table include file: valuebundle/default.xml
The file uses XML format and can contain multiple include elements.
| Parameter | Can Be Empty | Description |
|---|---|---|
| file | No | Config table file name included by this MOD. This file is located under the MOD project’s Excel directory and must include the extension. |
Config table rule mapping file: valuebundle/INDEX.xml
The file uses XML format and can contain multiple convert elements.
| Parameter | Can Be Empty | Description |
|---|---|---|
| reg | No | Corresponding mapping rule reg file, located under data/regV2. |
| from | No | Config table file name included by this MOD. This file is located under the MOD project’s Excel directory and must include the extension. |
Resource path mapping file: Interface/overrides.txt
This is a plain text file, one mapping rule per line.
See section 4, Resource Management, for the concrete format.
3. Config Tables
Section titled “3. Config Tables”1. Config Table Principle
Section titled “1. Config Table Principle”Sands of Salzaar uses config tables to author content. Config tables can contain value settings, formulas, story scripts, jump logic, or resource reference paths.
Config tables are independent Excel files. Tools provided by HSFramework package them into XML or executable binary files (values files). The workflow is:
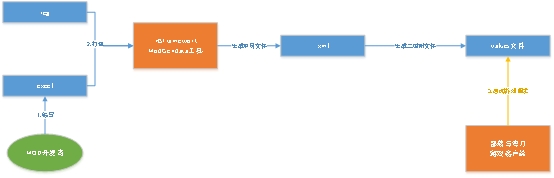
Config table packaging workflow
Development flow shown above:
- The MOD developer edits config tables (Excel).
(1) Note: reg files are the default Excel syntax constraint files provided by the game. MOD developers do not need to modify them.
-
Run the packaging tool to generate executable files (values).
-
Start the game client and debug the MOD package.
Important notes:
-
WPS is recommended for editing config tables.
-
Each data item in config tables has its own syntax and format requirements. Incorrect input may cause errors in step 2 (packaging) or step 3 (runtime). Pay attention to error messages.
-
Do not leave meaningless blank rows or columns in Excel, as they may cause unknown errors.
-
Avoid making many changes before testing. Small edits followed by immediate testing make problems easier to locate.
-
Player saves depend on IDs defined in config tables, so do not delete specified IDs from config tables. Deleting an ID can damage existing saves that use the MOD because the save can no longer find that ID. Mark old data as obsolete and create a new row with a new ID instead.
2. Data Types
Section titled “2. Data Types”Data types define the format that can be entered in a specific row of an Excel table.
The format is defined in reg files. See the type definitions in files under data/regV2 in the sample project.
Common formats include:
int: integer
float: floating-point number
string: string
If a value is filled incorrectly in Excel, packaging reports an error.
3. Variables and Condition Expressions
Section titled “3. Variables and Condition Expressions”Important: use half-width special symbols when editing scripts.
A condition expression group consists of multiple condition expressions such as [%condition%][=]1, connected by | (or) or & (and). & has higher priority than |. If both left and right values can be parsed as integers, numeric comparison is used; otherwise only string comparison is available, and only [=] and [<>] are supported.
For example, [%result_code%][=]1|[%player_money%][>=]100 means the following command executes when the result is 1, or the player has at least 100 money.
[%player:level%][>=]3&[%player_money%][>]100 means the player’s level is at least 3 and the player has more than 100 money.
For historical reasons, [%xxxx%] and [$xxxx$] are equivalent in actual Excel input and can both be used.
Condition expressions can be referenced from related XXX trigger .xls files.
4. Event Command Syntax
Section titled “4. Event Command Syntax”Important: use half-width special symbols when editing scripts.
Commands and parameters are separated with *; parameters are usually separated with #. Because dialogue commands are used frequently, the dialogue command name can be omitted when writing dialogue.
When an event is called by default, some current environment variables are passed in. Developers can use forms such as CUR_ROLE and [%tagrole%] to access variables.
For concrete commands, see the full command reference.
5. Other Hidden Config Table Syntax
Section titled “5. Other Hidden Config Table Syntax”Some config tables have their own hidden syntax. Incorrect values may not always fail during packaging, but may cause errors when running the game. Refer to the sample Excel files for the correct forms.
6. How MOD Config Tables Work
Section titled “6. How MOD Config Tables Work”Each Excel file contains its own IDs. If duplicate IDs exist, the later-loaded MOD overrides the earlier one. This makes it possible for MODs to modify the game. For example, in the standard game, C初始设定表.xls defines:
init_pos as 红石城外峡谷出生点:980,-1246
A MOD can add an initial settings table and rewrite the init_pos key to change the initial spawn position.
4. Resource Management
Section titled “4. Resource Management”1. Resource Management Overview
Section titled “1. Resource Management Overview”Resources include images, music, models, animations, effects, and other assets used by the game.
Sands of Salzaar uses one global resource namespace. Each resource has one unique full path. In a MOD, you can define resource override rules to replace or add resources.
Define override rules in Interface/overrides.txt.
For example, ABS\Audio\*>:\Buildsource\Audios\* means every file under the MOD’s ABS\Audios directory overrides or adds content under the original BuildSource\Audios directory. If the original file exists, it is overridden; otherwise a new file is added.
You can define override rules for specific paths under ABS or RES. Wildcards are supported, such as * for all files, and specific files can also be targeted.
Refer to the full resource mapping table for the existing Sands of Salzaar resource set.
2. Import RES Resources Through the Standard File System
Section titled “2. Import RES Resources Through the Standard File System”By default, all files under RES are copied into the published directory when the MOD is generated. This works for both Simple MOD Projects and Professional MOD Projects.
3. Import ABS Resources in Unity
Section titled “3. Import ABS Resources in Unity”By default, each directory under ABS is packaged into a separate AssetBundle.
This only takes effect when packaging a MOD from Unity in a Professional MOD Project.
5. Audio Management
Section titled “5. Audio Management”Audio resources can be imported through resource management rules. Simple MOD Projects support ogg audio files. Professional MOD Projects can use the fuller audio resource workflow.
6. Face Editor
Section titled “6. Face Editor”You can use Sands of Salzaar face-editing assets to modify NPC appearance. In the MOD editor, open the face editor to create your own combinations.
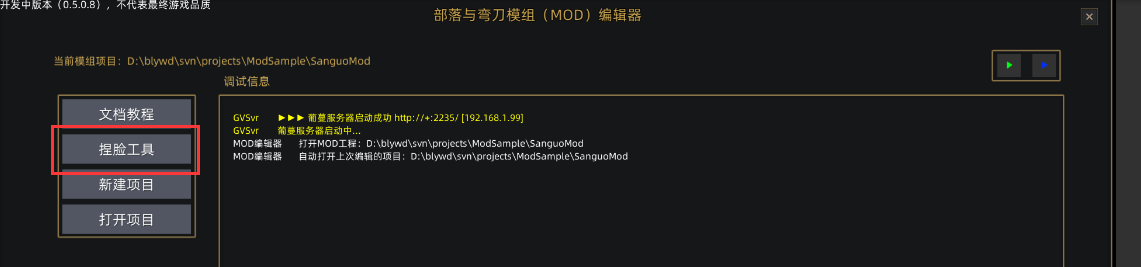
Face editor entry
The face editor’s internal data is shown here:
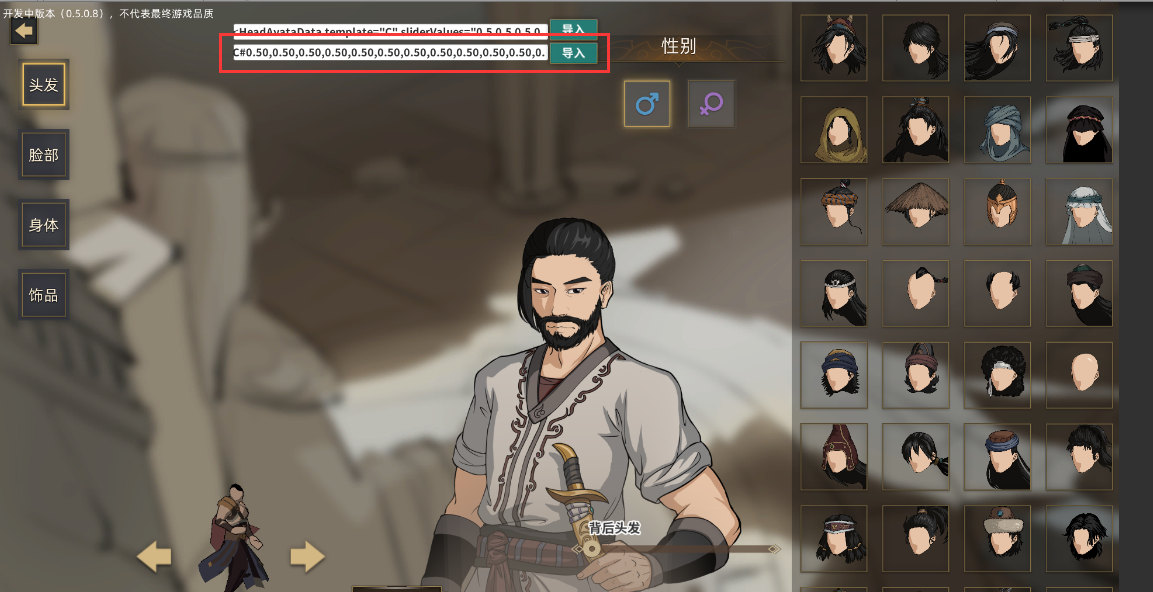
Face editor export
After editing this text box, click import to view other face data.
After finishing a face, copy this code and paste it into the corresponding config table as the role’s appearance info.
7. Skill Editing
Section titled “7. Skill Editing”Skills are edited by modifying skill config tables and overriding Assets/BuildSource/SkillData/*.txt. For detailed rules, see the skill command editing section of the full command reference.
The skill editor can be used for real-time editing and debugging.
8. 3D Models and Animations
Section titled “8. 3D Models and Animations”Use a Professional MOD Project and prepare/package the related resources through the Unity project.
9. Particle Effects
Section titled “9. Particle Effects”Use a Professional MOD Project and prepare/package the related resources through the Unity project.
10. Map Editor
Section titled “10. Map Editor”See Map Editor Guide for map editor usage.